Monday, May 21, 2012

Kitchen: Pepitas!!!

Raw pepitas...pumpkin seeds without their seed coat.  

    
     While pumpkin seeds are growing in popularity, I am constantly amazed at how often they are marketed in a roasted, salted, and often "flavored" variety.  The raw seeds have a wonderful "smoky" flavor on their own.  They are often found in granola and granola based bars.  I sprinkle them over salads.  They can be ground and added to breading for meats, especially chicken or deep-fried zucchini or mushrooms.  If you make a chicken breast roll, they can be added whole to your cheesy filling. Try adding them to pancakes, and stuffing.  I add them to a quick canned peach fruit compote, too. 

Why would you want to add these to your diet since these are not a low calorie food?  Generally, one would not eat more than a quarter of a cup at a time--and even then the calories run about 180! 
They are a good source of 
  • protein (complete)
  • zinc (cellular activity, protein synthesis, DNA synthesis, wound healing, and important in immune function)
  • iron (oxygen transport)
  • manganese
  • copper
  • magnesium
  • phosphorous
  • tryptophan
just to name a few.  At my healthiest point, though not my lowest weight, I was taking a daily lozenge that contained Zinc and Bee Propolis, as well as, Vitamin C.  The company that produced them STOPPED making them.  I also learned that you can build up the zinc, as well as other metals in your system, which I was close to doing.  I believe we are much safer when EATING our nutrients in our foods, rather than from a pill.  A sprinkling of seeds, and handful of nuts here and there will help provide us with many nutrients that may not even be on our "radar" yet. 


Try grinding some raw pepitas and mixing them into some cream cheese...add a few spices (celery seed, cracked pepper, hot sauce?)...and spread on crackers. 
 

Thursday, April 26, 2012

Kitchen: Pistachios

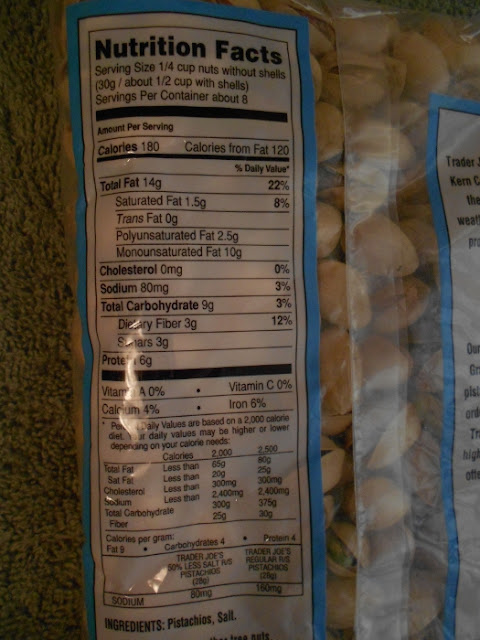
Less salt PISTACHIOS!!
I found these at Trader Joe's the other day.  I think they have a good flavor and having less salt is a good thing.  They call them 50% less salt.  Pistachios are one of the few times I eat roasted and salted nuts and seeds.  Usually, I prefer nuts and seeds raw.  (although I would like to try some raw pistachio butter).  


Monday, April 2, 2012

CRAFT: Earrings from Recycled Plastic


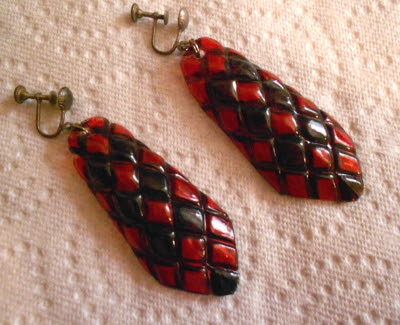
Can you guess what these were in their "first life"??

So, I was tossing the inspiration for these into the trash one day (before they had a recycling program here where I live), and I thought "what a neat pattern".  I decided to experiment a little and this is what I came up with.  I took the plastic and cut out the interesting portion.  I kept trimming it until I ended with this design. It was clear, so I grabbed the pointed end Sharpie (permanent) and started to "color" from behind.  Shortly, I had a nice black and red "snake skin-like" dangle.  I searched through a box of broken jewelry and found a pair of sterling screw-backs that were incomplete--so I removed the old pieces and attached the dangles to the backs with a couple of jump rings.  Voila!  Earrings from a--did you guess where the plastic came from?--a bottle of Wish-bone® dressingI don't even eat salad dressing...but my husband does.  
I'm not even sure the bottles are made the same way now.  The point of this exercise is to remember to take a look at what you are throwing away or tossing into the recycle bin.  Can you see some other use for it...can you give it a second life?  If you love to craft, you can certainly turn your trash into treasures!

Monday, March 26, 2012

Kitchen: Potato Leek Cheese Soup

Potatoes, leeks, carrots, celery, bacon, and CHEESE!


Soups are so much easier on the budget right now...back in the day, at least there was "cheap" food.  Even the "cheap" foods today aren't that cheap.  Ok, there is always Ramen noodles...but so high in sodium (salt) and not much food value or flavor.  Tuna is on sale for $1 a can and the cans just keep shrinking in size.  
This soup, is really good for lunch by itself, or with a sandwich...or as part of your evening meal.  Leeks are perfect with potatoes (and btw with chicken as well).  I haven't tried this with purple (aka blue) potatoes, but the Yukon Gold works nicely with this.  (You might even slip in a little white sweet potato in this--they aren't as sweet as regular sweet potatoes or yams)
  • 2 TB Olive Oil
  • 3 medium sized leeks, carefully washed, and sliced*
  • 4-6 carrots, sliced (or small chunks) (I usually use 2 med carrots per person)
  • 4 ribs of celery, sliced on an angle, if you like
  • 1 TB dried parsley leaves (optional)
  • 1/2 tsp celery seed
  • 1/2 cup fresh or frozen corn (optional)
  • Water (enough to cover the potatoes when you add them)
  • Salt (I use Vegesal (blue label)--a celery salt with other dried vegetables) (This amount will depend on taste preference and the amount of potatoes used)
  • Potatoes, (I prefer Yukon Gold with the skins on, but they do tend to break down a little) I use 2-3 medium potatoes per person--if I expect to have leftovers--otherwise, 1 1/2 potatoes per person.  You might prefer a "waxier" potato.
  • milk or half and half or cream
  • thickening agent (like flour or corn starch)
  • crumbled cooked bacon (or vegetarian substitute)
  • grated medium cheddar cheese 
  • Arizona Cheese Curds
Heat the olive oil and add the leeks to a dutch oven or soup pot.  Add the carrots, celery, parsley (you could substitute a little kale), celery seed and corn.  Allow them to cook a bit and mingle their flavors. 
At this point you add the water to cover the vegetables and cook them until they are just starting to become tender.  The potatoes can be left unpeeled (scrubbed well), or peeled.  It doesn't matter if you want large chunks or smaller bits of potato, just try to keep the size fairly uniform.  Once the potatoes have been added to the dutch oven or soup pot, make sure they are covered with water to at least an inch or two above their level.  Cover with lid and test often to see if the potatoes are done.  You are looking for a softened, but still firm, potato.  Add 1-2 cups of milk.  Prepare your thickening agent.  Once the water and milk have returned to a boil add the thickening agent.  Keep stirring until thickened, making sure there are no lumps and it doesn't burn.  Set the bacon bits and cheese out for family members and guests to top the soup themselves.  Salt and pepper to taste.  The cheese curds are great in soups...little globs of partially melted cheese...mmmmm!

Thursday, March 22, 2012

CRAFT: "Lady in Hat" Pin

Bits and Scraps become a lovely pin
The thing I love about this home crafted pin is that it took very little time to make and cost next to nothing...I could have used a little more "expensive" technique, but this was just an experiment.   
I am always looking at things around the house to see if they can be repurposed to something else.  If you break this piece down to it's parts, this is what you need:
  • A plastic base...by using the side of a pink plastic bottle, I cut out the shape and made good use of the curve already in the plastic.  Why pay for plastic blanks when you can use plastic bottles to make the base for bracelets, pins, hair ornaments, magnets, etc.?
  • decorative netting...I had found an old hat at the thrift store that was pretty far gone, but it had this netting, and some great feathers, that I rescued for art projects.
  • feathers...again, these were rescued from the old hat, and there were quite a few.
  • image of lady in hat...this was the most fun part of the pin.  I had gone to a swap meet and found an old catalog...it wasn't even complete!  It had many interesting (mostly) black and white images; very few in colorI already knew how to easily "colorize" the images the way I wanted them...all I had to do was to photocopy them on some heavy paper and use watercolor pencils to color them.  I added the circular highlights on my own.  If you are a talented artist, you could draw your own image.  You can also take advantage of the many copyright free image books and discs available, like those from DOVER BOOKS. (check out the free samples subscription on the left hand side of the page!) I buy those from thrift stores and used bookstores as well.  [IMPORTANT COPYRIGHT NOTE I did have to pay to do a search at the copyright office to make sure they were copyright free, which they now were. The copyright had expired.  That wasn't exactly cheap...but since they were no longer under copyright protection, I was free to use them as I wished--and there were quite a few.]  After I had colored the lady in the hat with the water color pencils, and used water to enhance the color, I let it dry.  
  • paper backing...if I were doing this over, I would use some type of cloth and sew the pin back to the cloth first, before gluing.
  • pin back...since I prefer stick pins, I probably would have used a stick pin instead, but as I said, this was just an experiment.  I attached it with a bit of hot glue)
  • Elmer's or Aleen's Glue...there are many really nice glues to try...this was just several coats of plain old white glue. 
Using the plastic blank I had cut from the pink plastic bottle, I took the netting and cut a piece that would fit over the blank, and used glue overall.  After that dried, I applied the feathers.  Apply several coats of glue to the colorized image.  Affix the image (after it is dried and trimmed of any excess dried glue) over the feathers.  Glue the paper (or cloth backing) to the back, and hot glue (or sew) the pinback.  So, keep your eyes open...look at those plastic bottles before you toss them!  

Sunday, March 18, 2012

KITCHEN: Multi-colored Fries

Multi-Colored Fries

What I like about trying to eat "healthier" is that you can sometimes do the old "bad" habits in a new way.  Ok, so maybe french fries aren't supposed to be included in our new diets, but is there anything we can do to tweak that just a little?  I could have done this in the oven as oven fries...I didn't, but that was an option.  I could have used an egg white wash instead of olive oil and grapeseed oil, that was another option.  I wanted real french fries...so I made them with the oil and fried them in a deep skillet.  The only change I wanted to see was the colorfulness of the fries.  I used 
  • Yukon Gold, for a buttery flavor
  • Sweet Potato, for a lightly sweet flavor
  • Blue (or purple) Potatoes, for a little more earthy flavor
The mix of the three types worked pretty well.  And I could have saved calories by using the oven fries option.  When switching a family member that is resisting the changes...you make them little by little...nothing too drastic.  We had already tried the blue potatoes, so that wasn't new, but using the sweet potato was different for us.  It turned out alright...everyone liked them.  I am liking the mix of the colors even more.  I did fry each type of potato separately though, since they have varying levels of sugars in them, I wanted to make sure some wouldn't burn while others were left undone.  I also use the process of frying the potatoes until they are transparent and have developed a "skin" from cooking, but they are not browned.  Remove them from the heat, cooling them on paper towel, and then re-frying them until they turn nice and brown.  This is supposed to help them get a good crisp, so they don't go limp.  Apparently, I did not re-fry them long enough, some of them did go a bit limp, but they tasted so good...who cares!  It has been a LONG time since I made regular french fries.  It's important to eat many "colors" as that is where the antioxidants seem to be. 
In a past blog I wrote about using tomato paste in a tube, (see Nov. 13, 2011), now there are suggestions that we switch out the use of tomato ketchup (catsup) in preference to the tomato paste in a tube.  While I could probably make the switch on a hamburger, I think I'll stick with the regular ketchup on fries for right now. 

also check out these links: Sweet potato vs. Yam

                                    : What George Washington Carver Wrote about Sweet Potato

Wednesday, February 22, 2012

Kitchen: Asparagus Soup


Asparagus Soup

Asparagus soup is relatively easy to make--unless of course you have an equipment failure during the process--as I happened to have!!  Once the ingredients are soft you generally put them in a blender or food processor or use one of those immersion blenders...but my blender AND my food processor FAILED; one after the other!  I did manage to finally blend the soup, but it took me a lot longer than it should have.  That is why the color of the asparagus is not quite as "green" as it should be...it did get a little over-done...but these are things we have to deal with in the kitchen...it didn't affect the taste, and I don't think the nutritional value was too hindered either.  


ASPARAGUS SOUP:
  • 2 TB olive oil
  • 1 medium onion, chopped  (you could substitute shallots if you like)
  • 1 or two cloves (not heads) of garlic, crushed
  • 1 bunch of asparagus...about a pound, tips cut off and saved (and a bowl of ice water), ends removed and discarded or better yet..composted.
  • 4 cups chicken stock or broth (lower salt version) (you may also substitute water instead)
  • 3/4 c. milk, cream, half and half, or non-dairy milk (are you going for low cal? or creamy--your choice) (or as little as you like)
  • 2 TB butter (salted or unsalted...asparagus is low in sodium to begin with)
  • thickening agent of your choice (flour, corn starch, arrow root, etc.)


Since most of us already have most of the ingredients on hand, except for the asparagus, when you see a good sale on asparagus you can easily whip this up.


Begin by chopping the onions.  Take the garlic cloves and smash them on a cutting board (wood or plastic) with the bottom of an iron skillet--remove the outer skins.  (Or remove the skins and crush them in a garlic press, if you prefer.) 


  • Prepare the fresh asparagus by washing thoroughly--making sure there is no sand or dirt in the tips.  Cut off the tips and set them aside to be cooked separately.  Remove the ends.  Try cutting in a few places moving each time a little farther from the end.  When it slices easily, you will cut off and discard the tough part.  OR you can take the time to peel the tough ends only discarding the very ends.  Chop the remaining stems into 1-2 inch pieces...trying to keep them about the same so they cook at the same rate. Prepare an "ice bath" (water with ice cubes)  for the tips, which you will cook separately. The ice bath will stop the cooking and keep your tips looking very green so you can used them to "dress" the soup.  (If you don't want to take this extra step, just cook the asparagus...tips and all...together.) 
  • Once you have all your ingredients cut, chopped, washed, and ready to go...
  • it's time to turn the heat on the dutch oven or soup pot.  Don't leave it too long heating before you add your oil...it's not good for the pan.  
  • Add the onions and cook them until they are starting to become softer, and almost translucent stirring so as not to brown too much
  • onions, garlic, asparagus and chicken broth
  • Add the garlic, again stirring frequently...no one likes the taste of burned garlic.
  • Add the chicken broth, stock, or water.  (If you have the time, it is nice to heat it before pouring into the pot, but it is not necessary.) 
  • Add the chopped asparagus spears...not the tips if you are going to use them for a garnish.
  • Allow this to cook on medium heat 'til the spears are tender.

asparagus tips on ice stops the cooking so keeps them green
  • Next, prepare the tips, either using a steam basket or placing them in boiling water for a short time...checking often until just tender...they should be fairly green.  When they are "done", remove them from the steamer or drain the water and immediately plunge them into the ice water.  (To stop the cooking so they retain their color and texture.)
  • After you allow the soup to cool a bit, you can use whatever means to blend it thoroughly...please use your imagination here, no pics, since I 
had and equipment failure!


  • Once all the soup is nicely blended...taste it to see if you have any "strings" from the stems, if you do, strain the soup. 
  • Return the soup to the pot and add the milk, cream, etc. or milk substitute and the butter (again, if you are going for low cal--you can skip the butter)
  • Bring the heat back up and add the thickening agent.  You don't want it really thick, only slightly thickened, if you used cream or half and half, you may not need any thickener at all)
  • Be VERY CAREFUL not to scorch your soup...if you think you have...DON'T STIR!  Remove the pan from the fire and pour it into another pan WITHOUT scraping the bottom...whatever sticks should stay in the old pan!!


almost there!
  •  Once heated through and thickened, you are ready to PRESENT your soup!
  • Placing it in a cup or a bowl, take several of the tips (either quickly heat them for a few seconds in the microwave--or dip them for a few seconds into boiling water to re-heat them) and arrange them in the bowl.  
  • My new go-to garnish is Pea Shoots!!  Kind of like sprouts, but the early growth of peas.  They are wonderfully pretty, and stand up well to temperatures...also great in salad, stir frys, etc. Tasty too!
  • Croutons and a bit of butter also for garnish.  If you feel you need salt, (and you may), you can use Gaylord Hauser's Vege (a kind of celery salt) or regular salt, and pepper is nice too.
 
mmmmmm......enjoy! 

 Here is a link to some asparagus nutritional facts to help you decide if this is right for you...and REMEMBER that some people process asparagus differently and it may cause a slight change in the odor of your hmmm...pee!  Yes, this happens and it is nothing to cause concern or alarm.  If you are doing any medical tests where you need to avoid sources of iodine, this is not the soup for you until they are completed.